Layer7模块介绍
在Linux的防火墙体系Netfilter下有一个独立的模块L7 filter 。从字面上看Netfilter是对网络数据的过滤,L7 filter是基于数据流应用层内容的过滤。不过实际上 L7 filter的本职工作不是对数据流进行过滤而是对数据流进行分类。它使用模式匹配算法把进入设备的数据包应用层内容与事先定义好的协议规则进行比对,如果匹配成功就说明这个数据包属于某种协议。
L7 filter是基于数据流工作的,建立在Netfilter connstrack功能之上。因为一个数据流或者说一个连接的所有数据都是属于同一个应用的,所以L7 filter没有必要对所以的数据包进行模式匹配,而只匹配一个流的前面几个数据包 (比如10个数据包)。当一个流的前面几个数据包包含了某种应用层协议的特征码时 (比如QQ),则这个数据流被L7 filter识别;当前面几个数据包的内容没有包含某种应用层协议的特征码时,则L7 filter放弃继续做模式匹配,这个数据流也就没有办法被识别,L7 filter所支持的协议可以去这个网址查看http://l7-filter.sourceforge.net/protocols
7层过滤首先需要内核支持,但是遗憾的是Centos内核中并没有layer7的模块。在Layer7官方测试中,内核版本2.6.28都是经过官方测试可用的(Centos5系列使用的是2.6.28)。在Centos6中使用的内核是2.6.32版本的,接下来我们使用Centos6去测试Layer7这个模块。具体对模块的测试可以去这个网址可以查看http://l7-filter.sourceforge.net/kernelcompat
PS:安装前可以查看一下/boot目录和grup.conf文件状态,然后比较跟安装后有什么变化。
Centos6.4实现Iptables七层过滤
一、下载需要的软件包(要注意版本)
|
1 2 3 4 |
kernel-2.6.32-431.5.1.el6.src.rpm netfilter-layer7-v2.23.tar.gz l7-protocols-2009-05-28.tar.gz iptables-1.4.21.tar.gz |
二、内核打Netfilter补丁
|
1 2 3 4 5 6 7 8 9 |
$ date 112414442015 $ tar xvf netfilter-layer7-v2.23.tar.gz -C /usr/src $ useradd mockbuild $ rpm -ihv kernel-2.6.32-431.5.1.el6.src.rpm $ cd rpmbuild/SOURCES/ $ tar xvf linux-2.6.32-431.5.1.el6.tar.bz2 -C /usr/src/ $ ln -sv /usr/src/linux-2.6.32-431.5.1.el6 /usr/src/linux $ cd /usr/src/linux $ patch -p1 < ../netfilter-layer7-v2.23/kernel-2.6.32-layer7-2.23.patch |
三、内核配置安装
|
1 2 3 4 5 |
# 复制2.6.32内核自带的.config文件拿来修改即可,以免出错. $ cp /boot/config-2.6.32-431.el6.x86_64 /usr/src/linux/.config # 在菜单模式开始编译前配置内核,需要做以下配置. $ make menuconfig |
1)取消模块签名认证
选择[*] Enable loadable module support —> 取消[ ] Module signature verification (EXPERIMENTAL)
选择-*- Cryptographic API —> 取消[ ] In-kernel signature checker (EXPERIMENTAL)
2)查看IPV4(IPV6)要支持以下功能
-*- Networking support —> Networking options —> [*] Network packet filtering framework (Netfilter) —> IP: Netfilter Configuration —> <M> IPv4 connection tracking support (required for NAT)
<M> Full NAT
<M> MASQUERADE target support
<M> NETMAP target support
<M> REDIRECT target support
-*- Networking support —> Networking options —> [*] Network packet filtering framework (Netfilter) —> IPv6: Netfilter Configuration
3)开启layer7模块
-*- Networking support —> Networking options —> [*] Network packet filtering framework (Netfilter) —> Core Netfilter Configuration
<M> Netfilter connection tracking support
< > “layer7” match support
<M> “string” match support
<M> “time” match support
<M> “iprange” match support
<M> “connlimit” match support
<M> “state” match support
<M> “conntrack” connection match support
<M> “mac” address match support
<M> “multiport” Multiple port match support
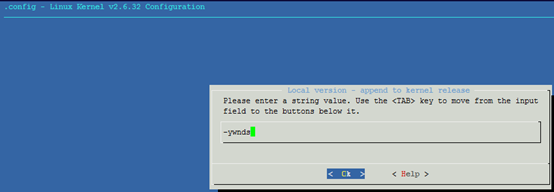
4)给内核起一个命令便于识别
General setup —> (-2.6.28.ywnds) Local version – append to kernel release
四、内核开始编译安装
|
1 2 3 4 5 6 7 8 |
# 编译整个内核模块. $ make # 先安装模块. $ make modules_install # 再安装内核. $ make install |
五、卸载原有Iptables
|
1 2 3 4 5 6 7 |
$ cp /etc/init.d/iptables ~/iptables $ cp /etc/sysconfig/iptables-config ~/iptables-config # 备份服务脚本,脚本配置文件,规则表. $ cp /etc/sysconfig/iptables ~/iptables-rule # 卸载现有的iptables(如果有iptstate包也要卸载). $ rpm -ve iptables-ipv6 iptables --nodeps |
六、重启系统
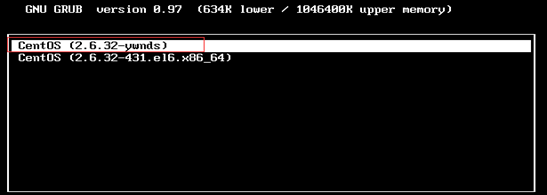
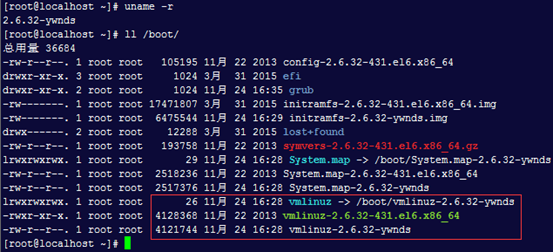
PS:重启系统默认就会应用新的内核,主要是因为内核安装完之后,就会在/boot目录和grup.conf文件中添加相应的设置,如下:
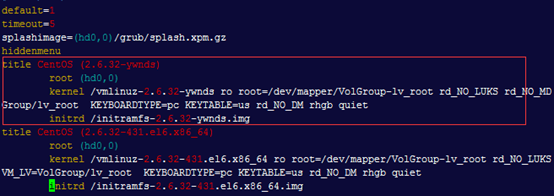
七、安装新Iptables
|
1 2 3 4 5 6 7 8 9 10 11 12 13 14 15 16 17 18 |
$ tar xvf iptables-1.4.21.tar.bz2 -C /usr/src/ $ cd /usr/src/iptables-1.4.21 # 复制layer7头文件和帮助文件到Iptables目录下(使iptbales能够支持layer7) $ cp /usr/src/netfilter-layer7-v2.23/iptables-1.4.3forward-for-kernel-2.6.20forward/libxt_layer7.* ./extensions/ # 编译安装 $ ./configure --prefix=/usr --with-ksource=/usr/src/linux $ make && make install # 恢复脚本,脚本配置文件以及规则表. $ cp /root/iptables /etc/rc.d/init.d/ $ cp /root/iptables-config /etc/sysconfig/ # 启动服务. $ ln -sv /usr/sbin/iptables /sbin/iptables $ chkconfig --add iptables $ service iptables start |
八、安装协议特征包l7-protocol-2009
|
1 2 3 4 5 6 7 8 |
$ tar xvf l7-protocols-2009-05-28.tar.gz -C /usr/src $ cd /usr/src/l7-protocols-2009-05-28/ $ make install $ mkdir -p /etc/l7-protocols $ cp -R * /etc/l7-protocols $ service iptables restart $ ls /etc/l7-protocols/protocols/ #此目录下保存的都是7层过滤支持的所有协议 |
九、验证七层过滤QQ
|
1 2 3 4 5 6 |
# 查看版本. $ iptables -V iptables v1.4.21 # 查看帮助. $ iptables -m layer7 --help |
1.开启iptables路由转发功能.
|
1 |
$ sysctl -w net.ipv4.ip_forward=1 |
2.设置SNAT(固定公网IP).
|
1 |
$ iptables -t nat -A POSTROUTING -s 192.168.10.0/24 -j SNAT --to-source 192.168.60.10 |
3.不允许转发QQ协议.
|
1 |
$ iptables -A FORWARD -s 192.1681.10.0/24 -m layer7 --l7proto qq -j DROP |
4.控制QQ可以使用的时间.
|
1 |
$ iptables -A FORWARD -s 192.168.10.0/24 -m layer7 --l7proto qq -m time --timestart 08:00:00 --timestop 12:00:00 -j DROP |

