一、前言
MySQL 5.7的发布,在复制方面有了很大的改进,比如开始支持多源复制(multi-source)了。以及真正的支持多线程复制了。需要说明一点的是,多源复制可以使用基于二进制日志的复制或者基于事务的复制。下面开始配置基于二进制日志的多源复制。
什么是多源复制?
首先,我们需要清楚几种常见的复制模式:
1)一主一从
2)一主多从
3)级联复制
4)Multi-master
但从MySQL 5.7已经开始又支持了一种复制方式,就是多源复制。MySQL 5.7之前只能实现一主一从、一主多从或者多主多从的复制,如果想实现多主一从的复制,只好使用MariaDB,但是MariaDB又与官方的MySQL版本不兼容的,在MySQL 5.7版本已经可以实现多主一从的复制了。MySQL 5.7版本相比之前的版本,无论在功能还是性能、安全等方面都已经提升了不少,值得大家去研究和使用。
比较常用的场景就是数据分析用,个人多源复制就是使用在数据分析场景中,数据分析部门需要同步其他多个业务的数据库信息到同一个数据库中。
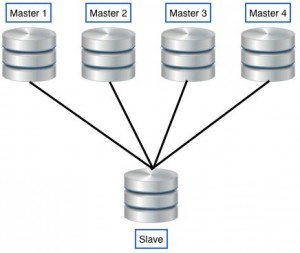
注意,其中multi-master与multi-source复制不是一样的。Multi-Master复制通常是环形复制,你可以在任意主机上将数据复制给其他主机。Multi-source是不同的,简单的说,多源复制就是将多个主的库同步到一个从库上面,从而增加从的利用率,出节省了机器,也可用于备份。如下图:
多源复制的作用?
那么多源复制有什么作用呢?说这么几种我在生产环境中碰到的情况吧。
第一种,一般企业内大数据部门会需要各个业务部门的部分数据做数据分析,这个时候就可以用到多源复制把各个主数据库的数据复制到统一的大数据数据库中。
第二种,搜索部门需要其他部门的数据做用户搜索匹配。
第三种、在从服务器进行数据汇总,如果我们的主服务器进行了分库分表的操作,为了实现后期的一些数据统计功能,往往需要把数据汇总在一起再统计。
第四种、如果我们想在从服务器时时对主服务器的数据进行备份,在MySQL 5.7之前每一个主服务器都需要一个从服务器,这样很容易造成资源浪费,同时也加大了DBA的维护成本,但MySQL 5.7引入多源复制,可以把多个主服务器的数据同步到一个从服务器进行备份。
使用多源复制的必要条件?
不管是使用基于二进制日志的复制或者基于事务的复制,要开启多源复制功能,必须需要在从库上首先设置master_info_repository和relay_log_info_repository两个参数为’TABLE’(在mysql库下可以看见这两个表信息),是用来存储同步信息的,可以设置的值为’FILE’和’TABLE’,默认是FILE。
这两个参数都是可以动态调整的。
|
1 2 |
SET GLOBAL master_info_repository = 'TABLE'; SET GLOBAL relay_log_info_repository = 'TABLE'; |
如果SLAVE为开启着,那么需要首先关闭SLAVE(STOP SLAVE;)。
我这边为了测试,所以只是在同一台机器上面开启了3个实例,MySQL版本为5.7.16。
|
1 2 3 |
10.0.60.143:3306 10.0.60.143:3307 10.0.60.143:3308 |
二、安装MySQL 5.7.16
详情可看:MySQL 5.7多方式安装
首先从MySQL官方网站下载YUM源,地址:http://dev.mysql.com/doc/mysql-yum-repo-quick-guide/en/
这里我选择MySQL 5.7的源进行安装MySQL 5.7,手动添加一个YUM源。
|
1 |
$ cat /etc/yum.repos.d/mysql.repo |
|
1 2 3 4 5 6 7 |
# Enable to use MySQL 5.7 [mysql57-community] name=MySQL 5.7 Community Server baseurl=http://repo.mysql.com/yum/mysql-5.7-community/el/6/$basearch/ enabled=1 gpgcheck=0 gpgkey=file:///etc/pki/rpm-gpg/RPM-GPG-KEY-mysql |
检查一下mysql repo
|
1 2 |
$ yum repolist enabled | grep mysql mysql57-community MySQL 5.7 Community Server 146 |
安装启动配置MySQL
|
1 2 |
$ yum install mysql-community-server-5.7.16 mysql-community-devel-5.7.16 mysql-community-client-5.7.16 mysql-community-common-5.7.16 $ service mysqld start |
MySQL 5.7以及安装完成了,为了简便,我这里使用多实例的方式进行测试在线变更复制类型,开两个端口3306和3307。
首先创建一些标准目录。
|
1 2 3 4 5 6 7 |
$ mkdir /data/mysql/3306/{conf,data,log} -p $ mkdir /data/mysql/3306/log/{binlog,relaylog,slowlog} -p $ mkdir /data/mysql/3307/{conf,data,log} -p $ mkdir /data/mysql/3307/log/{binlog,relaylog,slowlog} -p $ mkdir /data/mysql/3308/{conf,data,log} -p $ mkdir /data/mysql/3308/log/{binlog,relaylog,slowlog} -p $ chown mysql.mysql -R /data/mysql |
下面开始进行初始化操作。
|
1 2 3 |
$ mysqld --initialize-insecure --user=mysql --datadir=/data/mysql/3306/data $ mysqld --initialize-insecure --user=mysql --datadir=/data/mysql/3307/data $ mysqld --initialize-insecure --user=mysql --datadir=/data/mysql/3308/data |
看一下初始化后的目录文件,如下:
|
1 2 3 4 5 6 7 8 9 10 11 |
$ ll /data/mysql/3306/data/ total 122908 -rw-r----- 1 mysql mysql 56 Nov 21 10:43 auto.cnf -rw-r----- 1 mysql mysql 260 Nov 21 11:58 ib_buffer_pool -rw-r----- 1 mysql mysql 50331648 Nov 21 11:58 ib_logfile0 -rw-r----- 1 mysql mysql 50331648 Nov 21 10:43 ib_logfile1 -rw-r----- 1 mysql mysql 12582912 Nov 21 11:58 ibdata1 -rw-r----- 1 mysql mysql 12582912 Nov 21 11:58 ibtmp1 drwxr-x--- 2 mysql mysql 4096 Nov 21 10:43 mysql drwxr-x--- 2 mysql mysql 4096 Nov 21 10:43 performance_schema drwxr-x--- 2 mysql mysql 12288 Nov 21 10:43 sys |
三、启动多实例
1)给每个实例提供配置文件
给3306(master)实例提供一份配置文,如下:
|
1 2 3 4 5 6 7 8 9 10 11 12 13 14 15 16 17 18 19 20 21 22 23 24 25 26 27 28 29 30 31 32 33 34 35 36 37 38 39 40 41 42 43 44 45 46 47 48 49 50 51 52 53 54 55 56 57 58 59 60 61 62 63 64 |
$ cat /data/mysql/3306/conf/my.cnf [mysqld] ############################basic settings####################### port=3306 bind-address=0.0.0.0 datadir=/data/mysql/3306/data socket=/data/mysql/3306/mysql.sock pid-file=/data/mysql/3306/mysql.pid user=mysql server-id = 10 character_set_server = utf8mb4 skip_name_resolve = 1 max_allowed_packet = 16777216 max_connections = 800 max_connect_errors = 1000 tmpdir = /tmp tmp_table_size = 67108864 explicit_defaults_for_timestamp = 1 join_buffer_size = 134217728 interactive_timeout = 1800 wait_timeout = 1800 read_buffer_size = 16777216 read_rnd_buffer_size = 33554432 sort_buffer_size = 33554432 key_buffer_size = 256M thread_cache_size = 8 transaction_isolation = READ-COMMITTED ###########################log settings##################### log-bin = /data/mysql/3306/log/binlog/mysql-bin log_bin_index = /data/mysql/3306/log/binlog/mysql-bin.index expire_logs_days = 30 binlog_format = ROW log_error = /data/mysql/3306/log/error.log ##########################innodb settings################### innodb_buffer_pool_size = 512m innodb_sort_buffer_size = 27108864 innodb_buffer_pool_load_at_startup = 1 innodb_buffer_pool_dump_at_shutdown = 1 innodb_lock_wait_timeout = 5 innodb_flush_method = O_DIRECT innodb_file_format = Barracuda innodb_file_format_max = Barracuda innodb_thread_concurrency = 24 innodb_flush_neighbors = 1 innodb_purge_threads = 4 innodb_large_prefix = 1 innodb_print_all_deadlocks = 1 innodb_strict_mode = 1 innodb_file_per_table = ON innodb_flush_log_at_trx_commit=2 ##########################start gtid########################### #gtid-mode = on #enforce-gtid-consistency = true #master-info-repository = table #relay-log-info-repository = table #log-slave-updates = true #binlog-checksum = CRC32 #master-verify-checksum = 1 #slave-sql-verify-checksum = 1 #slave_allow_batching = 1 #binlog-rows-query-log_events = 1 |
给3307(slave)实例提供一份配置文件,如下:
|
1 2 3 4 5 6 7 8 9 10 11 12 13 14 15 16 17 18 19 20 21 22 23 24 25 26 27 28 29 30 31 32 33 34 35 36 37 38 39 40 41 42 43 44 45 46 47 48 49 50 51 52 53 54 55 56 57 58 59 60 61 62 63 64 65 |
$ cat /data/mysql/3307/conf/my.cnf [mysqld] ############################basic settings####################### port=3307 bind-address=0.0.0.0 datadir=/data/mysql/3307/data socket=/data/mysql/3307/mysql.sock pid-file=/data/mysql/3307/mysql.pid user=mysql server-id = 20 character_set_server = utf8mb4 skip_name_resolve = 1 max_allowed_packet = 16777216 max_connections = 800 max_connect_errors = 1000 tmpdir = /tmp tmp_table_size = 67108864 explicit_defaults_for_timestamp = 1 join_buffer_size = 134217728 interactive_timeout = 1800 wait_timeout = 1800 read_buffer_size = 16777216 read_rnd_buffer_size = 33554432 sort_buffer_size = 33554432 key_buffer_size = 256M thread_cache_size = 8 transaction_isolation = READ-COMMITTED ###########################log settings##################### log-bin = /data/mysql/3307/log/binlog/mysql-bin log_bin_index = /data/mysql/3307/log/binlog/mysql-bin.index expire_logs_days = 30 binlog_format = ROW log_error = /data/mysql/3307/log/error.log ##########################innodb settings################### innodb_buffer_pool_size = 512m innodb_sort_buffer_size = 27108864 innodb_buffer_pool_load_at_startup = 1 innodb_buffer_pool_dump_at_shutdown = 1 innodb_lock_wait_timeout = 5 innodb_flush_method = O_DIRECT innodb_file_format = Barracuda innodb_file_format_max = Barracuda innodb_thread_concurrency = 24 innodb_flush_neighbors = 1 innodb_purge_threads = 4 innodb_large_prefix = 1 innodb_print_all_deadlocks = 1 innodb_strict_mode = 1 innodb_file_per_table = ON innodb_flush_log_at_trx_commit=2 #########################start gtid######################### #gtid-mode = on #enforce-gtid-consistency = true #log-slave-updates = true #master-info-repository = table #relay-log-info-repository = table #slave-parallel-workers = 1 #binlog-checksum=CRC32 #master-verify-checksum = 1 #slave-sql-verify-checksum = 1 #slave_allow_batching = 1 #binlog-rows-query-log_events = 1 |
给3308(slave)实例提供一份配置文件,如下:
|
1 2 3 4 5 6 7 8 9 10 11 12 13 14 15 16 17 18 19 20 21 22 23 24 25 26 27 28 29 30 31 32 33 34 35 36 37 38 39 40 41 42 43 44 45 46 47 48 49 50 51 52 53 54 55 56 57 58 59 60 61 62 63 64 65 66 67 68 69 70 71 72 73 74 75 76 77 78 |
$ cat /data/mysql/3308/conf/my.cnf [mysqld] ############################basic settings####################### port=3308 bind-address=10.0.60.143 datadir=/data/mysql/3308/data socket=/data/mysql/3308/mysql.sock pid-file=/data/mysql/3308/mysql.pid user=mysql server-id = 30 character_set_server = utf8mb4 skip_name_resolve = 1 max_allowed_packet = 16777216 max_connections = 800 max_connect_errors = 1000 tmpdir = /tmp tmp_table_size = 67108864 explicit_defaults_for_timestamp = 1 join_buffer_size = 134217728 interactive_timeout = 1800 wait_timeout = 1800 read_buffer_size = 16777216 read_rnd_buffer_size = 33554432 sort_buffer_size = 33554432 key_buffer_size = 256M thread_cache_size = 8 transaction_isolation = READ-COMMITTED ###########################log settings##################### log-bin = /data/mysql/3308/log/binlog/mysql-bin log_bin_index = /data/mysql/3308/log/binlog/mysql-bin.index expire_logs_days = 30 binlog_format = ROW log_error = /data/mysql/3308/log/error.log ##########################innodb settings#################### innodb_buffer_pool_size = 512m innodb_sort_buffer_size = 27108864 innodb_buffer_pool_load_at_startup = 1 innodb_buffer_pool_dump_at_shutdown = 1 innodb_lock_wait_timeout = 5 innodb_flush_method = O_DIRECT innodb_file_format = Barracuda innodb_file_format_max = Barracuda innodb_thread_concurrency = 24 innodb_flush_neighbors = 1 innodb_purge_threads = 4 innodb_large_prefix = 1 innodb_print_all_deadlocks = 1 innodb_strict_mode = 1 innodb_file_per_table = ON innodb_flush_log_at_trx_commit=2 ######################start replication######################## relay-log = /data/mysql/3308/log/relaylog/relay-log log-slave-updates = true skip-slave-start = true master-info-repository = table relay-log-info-repository = table report-port = 3308 report-host = 10.0.60.143 replicate-do-db = test1 replicate-do-db = test2 replicate-do-table = test1.test1 replicate-do-table = test2.test2 #####################start gtid################################ #gtid-mode = on #enforce-gtid-consistency = true #sync-master-info = 1 #slave-parallel-workers = 1 #binlog-checksum=CRC32 #master-verify-checksum = 1 #slave-sql-verify-checksum = 1 #slave_allow_batching = 1 #binlog-rows-query-log_events = 1 #relay_log_purge = 1 #relay_log_recovery = 1 |
PS:配置文件很清楚,如果想使用GTID,开启对应的参数即可。
重新赋予一下权限
|
1 |
$ chown mysql.mysql -R /data/mysql |
2)启动多实例
|
1 2 3 |
$ nohup mysqld --defaults-file=/data/mysql/3306/conf/my.cnf & $ nohup mysqld --defaults-file=/data/mysql/3307/conf/my.cnf & $ nohup mysqld --defaults-file=/data/mysql/3308/conf/my.cnf & |
PS:进入MySQL需要使用-S指定各自的mysql.sock文件。
3)主库(3306,3307)创建具有复制权限的用户
|
1 2 3 |
mysql> reset master; mysql> grant replication slave on *.* to 'backup'@'%' identified by '123456'; mysql> flush privileges; |
4)从库(3308)连接至主库 (3306,3307)
现在我们有了通信渠道的概念,每一个通信渠道都是一个从服务器从主服务器获得二进制日志的链接。这意味着每个通信渠道都得有一个IO_THREAD。我们需要运行不同的”CHANGE MASTER”命令, 对于每一个主服务器。我们需要用到”FOR CHANNEL”这个参数来提供通信链接的名字。
下面开始设置同步的源,同步3306和3307。
CHANGE MASTER 3306
|
1 2 3 4 5 6 |
mysql> CHANGE MASTER TO MASTER_HOST='10.0.60.143', MASTER_USER='backup', MASTER_PORT=3306, MASTER_PASSWORD='123456', MASTER_LOG_FILE='mysql-bin.000001', MASTER_LOG_POS=1 FOR CHANNEL 'master_3306'; |
CHANGE MASTER 3307
|
1 2 3 4 5 6 |
mysql> CHANGE MASTER TO MASTER_HOST='10.0.60.143', MASTER_USER='backup', MASTER_PORT=3307, MASTER_PASSWORD='123456', MASTER_LOG_FILE='mysql-bin.000001', MASTER_LOG_POS=1 FOR CHANNEL 'master_3307'; |
5)启动所有SLAVE
|
1 |
mysql> START SLAVE; |
或者
|
1 2 |
mysql> START SLAVE FOR CHANNEL 'master_3306'; mysql> START SLAVE FOR CHANNEL 'master_3307'; |
停止和RESET复制的命令也同START类似,可以操作所有的,也可以操作单个通道。
如果想删除某个源,命令如下:
|
1 |
mysql> RESET SLAVE ALL FOR CHANNEL 'master_3306'; |
6)查看SLAVE信息
|
1 2 3 4 5 6 7 8 9 10 11 12 13 14 15 16 17 18 19 20 21 22 23 24 25 26 27 28 29 30 31 32 33 34 35 36 37 38 39 40 41 42 43 44 45 46 47 48 49 50 51 52 53 54 55 56 57 58 59 60 61 62 63 64 65 66 67 68 69 70 71 72 73 74 75 76 77 78 79 80 81 82 83 84 85 86 87 88 89 90 91 92 93 94 95 96 97 98 99 100 101 102 103 104 105 106 107 108 109 110 111 112 113 114 115 116 117 118 |
mysql> show slave status\G *************************** 1. row *************************** Slave_IO_State: Waiting for master to send event Master_Host: 10.0.60.143 Master_User: backup Master_Port: 3306 Connect_Retry: 60 Master_Log_File: mysql-bin.000001 Read_Master_Log_Pos: 154 Relay_Log_File: relay-log-master_3306.000002 Relay_Log_Pos: 367 Relay_Master_Log_File: mysql-bin.000001 Slave_IO_Running: Yes Slave_SQL_Running: Yes Replicate_Do_DB: test1,test2 Replicate_Ignore_DB: Replicate_Do_Table: test2.test2,test1.test1 Replicate_Ignore_Table: Replicate_Wild_Do_Table: Replicate_Wild_Ignore_Table: Last_Errno: 0 Last_Error: Skip_Counter: 0 Exec_Master_Log_Pos: 154 Relay_Log_Space: 580 Until_Condition: None Until_Log_File: Until_Log_Pos: 0 Master_SSL_Allowed: No Master_SSL_CA_File: Master_SSL_CA_Path: Master_SSL_Cert: Master_SSL_Cipher: Master_SSL_Key: Seconds_Behind_Master: 0 Master_SSL_Verify_Server_Cert: No Last_IO_Errno: 0 Last_IO_Error: Last_SQL_Errno: 0 Last_SQL_Error: Replicate_Ignore_Server_Ids: Master_Server_Id: 10 Master_UUID: 3b4cc092-af94-11e6-8a81-001dd8b71e2b Master_Info_File: mysql.slave_master_info SQL_Delay: 0 SQL_Remaining_Delay: NULL Slave_SQL_Running_State: Slave has read all relay log; waiting for more updates Master_Retry_Count: 86400 Master_Bind: Last_IO_Error_Timestamp: Last_SQL_Error_Timestamp: Master_SSL_Crl: Master_SSL_Crlpath: Retrieved_Gtid_Set: Executed_Gtid_Set: Auto_Position: 0 Replicate_Rewrite_DB: Channel_Name: master_3306 Master_TLS_Version: *************************** 2. row *************************** Slave_IO_State: Waiting for master to send event Master_Host: 10.0.60.143 Master_User: backup Master_Port: 3307 Connect_Retry: 60 Master_Log_File: mysql-bin.000001 Read_Master_Log_Pos: 154 Relay_Log_File: relay-log-master_3307.000002 Relay_Log_Pos: 367 Relay_Master_Log_File: mysql-bin.000001 Slave_IO_Running: Yes Slave_SQL_Running: Yes Replicate_Do_DB: test1,test2 Replicate_Ignore_DB: Replicate_Do_Table: test2.test2,test1.test1 Replicate_Ignore_Table: Replicate_Wild_Do_Table: Replicate_Wild_Ignore_Table: Last_Errno: 0 Last_Error: Skip_Counter: 0 Exec_Master_Log_Pos: 154 Relay_Log_Space: 580 Until_Condition: None Until_Log_File: Until_Log_Pos: 0 Master_SSL_Allowed: No Master_SSL_CA_File: Master_SSL_CA_Path: Master_SSL_Cert: Master_SSL_Cipher: Master_SSL_Key: Seconds_Behind_Master: 0 Master_SSL_Verify_Server_Cert: No Last_IO_Errno: 0 Last_IO_Error: Last_SQL_Errno: 0 Last_SQL_Error: Replicate_Ignore_Server_Ids: Master_Server_Id: 20 Master_UUID: 47af3f9d-af94-11e6-8b5b-001dd8b71e2b Master_Info_File: mysql.slave_master_info SQL_Delay: 0 SQL_Remaining_Delay: NULL Slave_SQL_Running_State: Slave has read all relay log; waiting for more updates Master_Retry_Count: 86400 Master_Bind: Last_IO_Error_Timestamp: Last_SQL_Error_Timestamp: Master_SSL_Crl: Master_SSL_Crlpath: Retrieved_Gtid_Set: Executed_Gtid_Set: Auto_Position: 0 Replicate_Rewrite_DB: Channel_Name: master_3307 Master_TLS_Version: 2 rows in set (0.00 sec) |
7)测试多源复制
首先在3306(主库)实例创建一些数据。
|
1 2 3 4 |
mysql> create database test1; mysql> use test1; mysql> CREATE TABLE `test1` (`id` int(11) DEFAULT NULL,`count` int(11) DEFAULT NULL); mysql> insert into test1 values(1,1); |
然后在3307(主库)实例创建一些数据。
|
1 2 3 4 |
mysql> create database test2; mysql> use test2; mysql> CREATE TABLE `test2` (`id` int(11) DEFAULT NULL,`count` int(11) DEFAULT NULL); mysql> insert into test2 values(1,1); |
然后再3308(从库)实例看数据是否复制过来了。
|
1 2 3 4 5 6 7 8 9 10 11 12 13 14 15 |
mysql> select * from test1.test1; +------+-------+ | id | count | +------+-------+ | 1 | 1 | +------+-------+ 1 row in set (0.00 sec) mysql> select * from test2.test2; +------+-------+ | id | count | +------+-------+ | 1 | 1 | +------+-------+ 1 row in set (0.00 sec) |
由于做了复制过滤,所以创建其他的库或者是表,都无法再从库重现的。你可以自行测试。
8)查看复制管理视图
在performance_schema库中,提供了复制相关的一些视图,可供查看复制相关的信息。
|
1 2 3 4 5 6 7 8 9 10 11 12 13 14 15 |
mysql> use performance_schema; mysql> show tables like '%repl%'; +-------------------------------------------+ | Tables_in_performance_schema (%repl%) | +-------------------------------------------+ | replication_applier_configuration | | replication_applier_status | | replication_applier_status_by_coordinator | | replication_applier_status_by_worker | | replication_connection_configuration | | replication_connection_status | | replication_group_member_stats | | replication_group_members | +-------------------------------------------+ 8 rows in set (0.00 sec) |
有多源通道的配置信息和多源通道的状态信息,另外有连接配置信息和连接状态信息,如果配置了多线程复制的话,还会有多线程配置信息和多线程状态信息。
多源库使用跟主从复制基本一样,特别有一点需要注意的就是同一个多源库中不能有相同名称的库名,MySQL并没有做什么冲突检测机制。


